An email list is the one audience Google can't take away from you. That's why every site deserves a sign-up form, and Mailchimp is still the easiest place for most people to start. In this guide, I'll show you how to configure Mailchimp on WordPress with a free plugin, step by step, using screenshots from a fresh WordPress 7.1.4 site I set up for this article.
I have been using WordPress since 2014, and I run several eCommerce sites of my own on it, so I know how much a growing email list is worth. The good news is that connecting Mailchimp takes only a few minutes, and you don't need to touch any code.
What You Need to Configure Mailchimp on WordPress
You only need two things: administrator access to your WordPress site and a Mailchimp account. If you don't have one yet, Mailchimp's Free plan is enough to begin with. According to Mailchimp's own help pages, it includes up to 250 contacts and 500 email sends a month, with a daily limit of 250 sends.
One limitation to know up front: if your list grows beyond 250 contacts on the Free plan, Mailchimp temporarily holds your email campaigns until you upgrade or reduce the list. You can still collect new sign-ups during that period, so nothing actually breaks on your WordPress side.
Step 1: Install the MC4WP Plugin
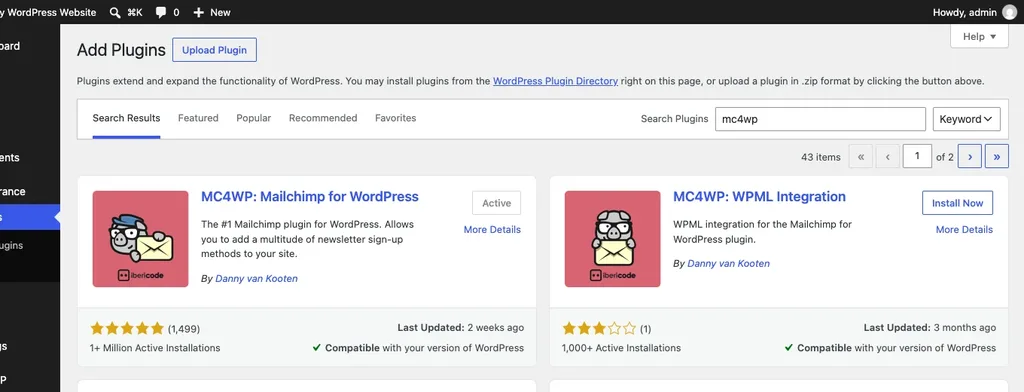
There are a few Mailchimp plugins for WordPress, but the one I recommend is MC4WP: Mailchimp for WordPress by ibericode. When I checked WordPress.org, it had more than 1 million active installs and a 4.8-star rating from 1,499 reviews. Version 4.15.0 was updated on November 3, 2026, and it's tested with WordPress 7.1.4.
To install it, I went to Plugins → Add New Plugin, searched for "MC4WP", and clicked Install Now and then Activate, after which a new MC4WP menu immediately appeared in the left-hand admin menu.
Why not Mailchimp's own plugin? Mailchimp does publish an official one, called Mailchimp List Subscribe Form, but it has around 60,000 installs and a 2.6-star rating, so MC4WP simply has a far more convincing track record.
Step 2: Create a Mailchimp API Key
The plugin communicates with your Mailchimp account through an API key, which is basically a long, unique password for applications. Think of it as a spare house key that you give to WordPress, so treat it like a password. Here is how Mailchimp's help center says to create one:
- Log in to Mailchimp, click your profile icon and choose Profile.
- Open the Extras drop-down and pick API keys.
- In the Your API Keys section, click Create A Key.
- Give it a clear name, like "WordPress sign-up form", and click Generate Key.
- Click Copy Key to Clipboard, then Done.
Copy it right away, because Mailchimp displays the complete key only once. If you lose it, you'll have to generate a replacement and update every integration that depends on the old one.
But one thing, and this is new: Mailchimp says that any API key created on or after June 22, 2026, expires one year after it was made. So add a reminder to your calendar for next year, otherwise your form will quietly stop adding subscribers to your audience on the day the key expires.
Step 3: Connect the Plugin to Mailchimp
Back in WordPress, I went to MC4WP → Mailchimp. On a fresh install, the status shows NOT CONNECTED, as you can see in the screenshot. There is also a handy "Get your API key here" link that opens the API keys page in your Mailchimp account.
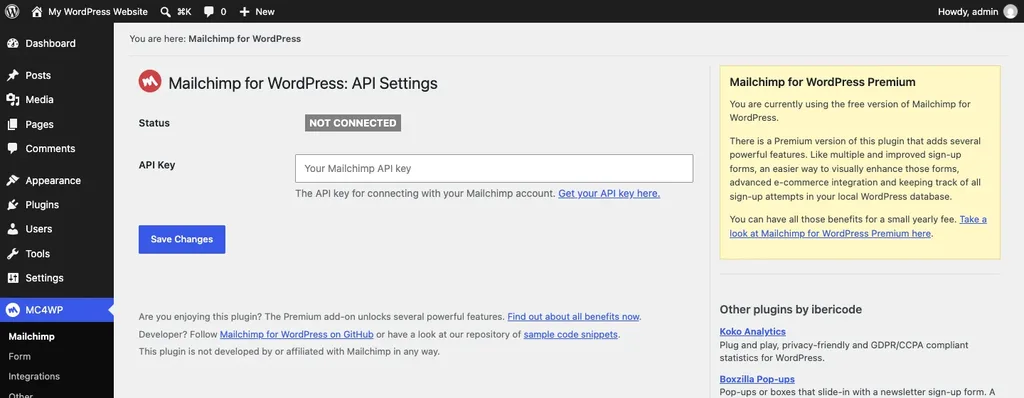
Paste your key into the API Key field and click Save Changes. Once the key is accepted, the status changes to CONNECTED, and the plugin can read the audiences in your account.
A small tip for developers: MC4WP also lets you define the key in wp-config.php with an MC4WP_API_KEY constant. That keeps the key out of the database, which is nice if other people also have admin access to your site.
Step 4: Set Up Your Sign-Up Form
Next, open MC4WP → Form. The free version includes one form, and the editor organizes everything into four tabs: Fields, Messages, Settings and Appearance.
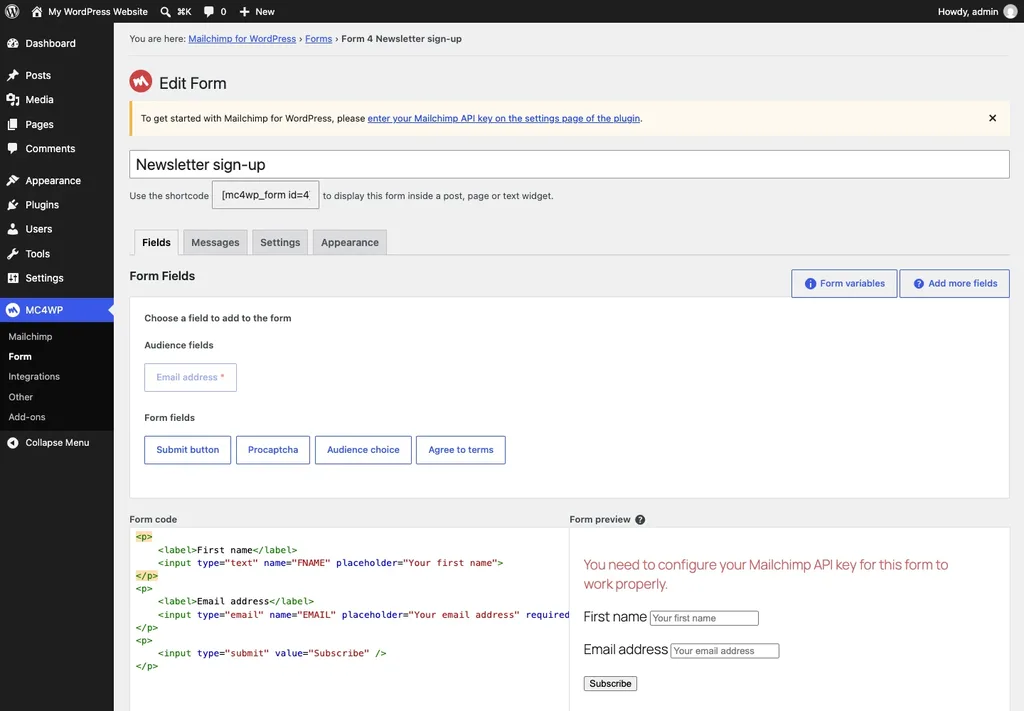
On the Fields tab, you can click buttons to add fields such as a submit button, a consent checkbox or any field your Mailchimp audience uses. I added a first name field above the email address, so my emails can greet people by name instead of a plain "Hi there".
Now comes the most important setting, and it's the one beginners usually miss. Open the Settings tab and tick your list under Audiences this form subscribes to. If no audiences show up there, the plugin isn't connected yet, so go back to Step 3.
On the same tab, you'll see Use double opt-in?, which is switched on by default. Leave it enabled, since every new subscriber then receives a confirmation email before joining, which keeps fake and mistyped addresses out of your audience. The plugin even warns that turning it off may affect your GDPR compliance.
Step 5: Add the Form to a Page
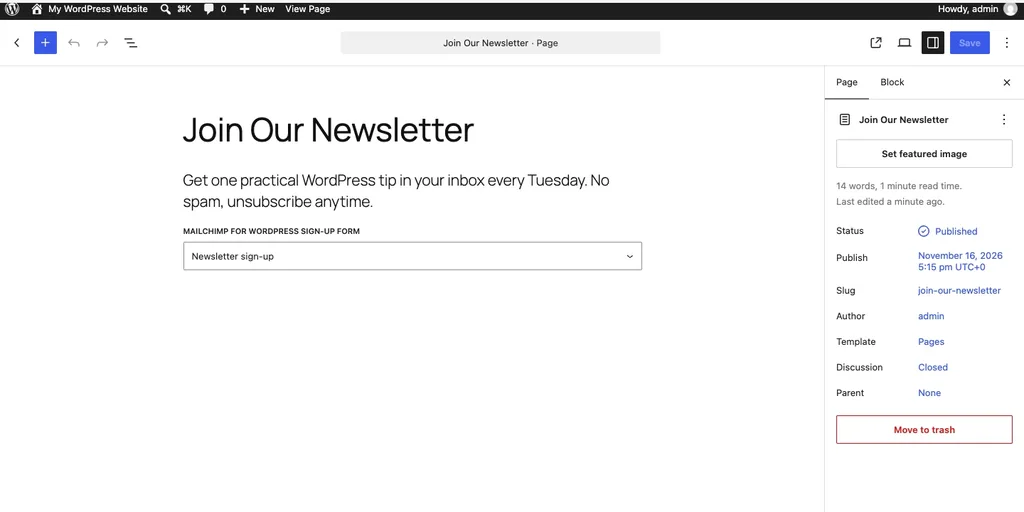
You have two easy options here, depending on how you build your pages. In the block editor, add the Mailchimp for WordPress Sign-up Form block and pick your form from the drop-down. Or, if you use a page builder, paste the shortcode the plugin gives you, which looks like [mc4wp_form id="4"].
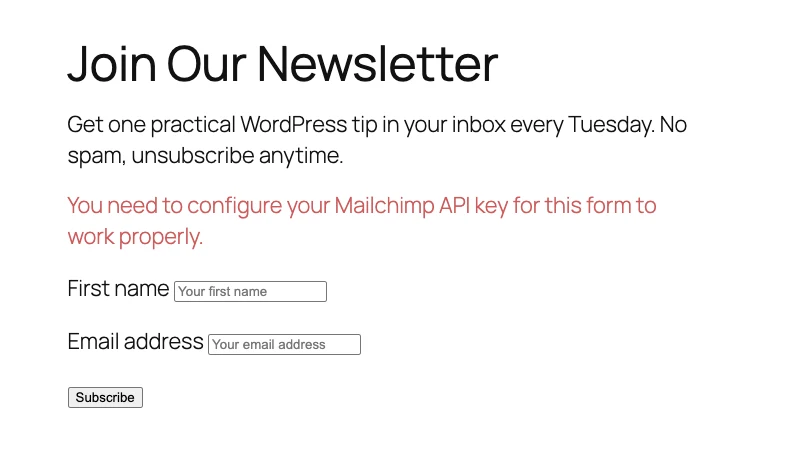
Here is how the form looked on the published page of my test site. The red notice at the top only appears because I didn't connect a real Mailchimp account to this demonstration site, and on your site, that warning disappears once a valid API key is saved.
Bonus: Add Sign-Up Checkboxes to Other Forms
This is my favorite part of MC4WP, and it's often overlooked. Under MC4WP → Integrations, you can automatically add a "Sign me up for the newsletter" checkbox to forms that already exist on your site, such as the comment form and the WordPress registration form.
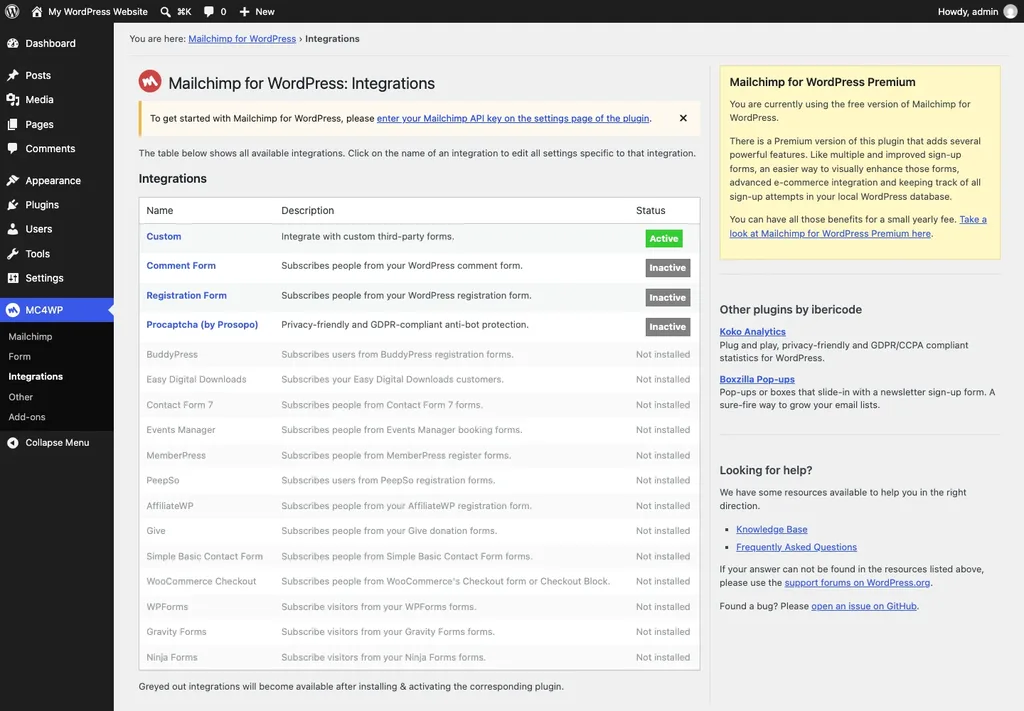
If you run a store, the list also includes WooCommerce Checkout, so buyers can join your list while paying. Contact Form 7, WPForms, Gravity Forms and Ninja Forms are supported as well. Each one becomes clickable after you install that plugin.
Test It Before You Tell Anyone
Before you share the page with visitors, run a quick test. Subscribe with your own email address, open the confirmation email and click the link, then check your audience in Mailchimp, where your address should appear as a new contact. If the confirmation email doesn't arrive, look in your spam folder first.
If nothing shows up in Mailchimp, check these three things:
- The status under MC4WP → Mailchimp still says CONNECTED.
- An audience is ticked on the form's Settings tab.
- Your account is still under the Free plan's 250-contact limit.
Mailchimp on WordPress: FAQs
Is MC4WP free?
Yes. MC4WP is free on WordPress.org and covers everything in this guide. There is a paid Premium add-on for extras such as multiple forms and eCommerce tracking, but you don't need it to start a newsletter.
Do I need WooCommerce for Mailchimp?
No. MC4WP works on any WordPress site, whether it's a personal blog or a business website. Store owners who want order data in Mailchimp can also look at the separate Mailchimp for WooCommerce plugin, which has about 200,000 active installs.
Why did my Mailchimp form stop working after a year?
Most likely, your API key expired. Mailchimp keys created on or after June 22, 2026, expire one year after they are made. Create a new key, paste it into MC4WP → Mailchimp, and save.
Wrapping Up
That's all it takes to configure Mailchimp on WordPress: install MC4WP, create an API key, connect it, pick your audience and add the form block. Coming to the matter of results, the form itself is the easy part. What grows your list is giving people a real reason to join, like a weekly tip, a coupon or a free checklist. If you run an online store, our list of the best WooCommerce plugins has more tools that pair well with your new list.
Have a question about your Mailchimp setup? Leave it in the comments below, and I'll do my best to help.